Showing posts with label contracting. Show all posts

May 1, 2016

Finishing Touches... Finally!

I wish I had about 8 months worth of work on the house to write about... But we've been moving at a snail's pace! Maybe even slower than a snail. 

The weather is warming up, so we're diving right in. 

Over the winter we did manage to install our backsplash. We decided to go with a 3"X11" faux marble tile with white grout. I love it! We have purchased all of our tile, including this one, from Tile Town on Hamilton Road. They have such cool products, great prices and the staff is so friendly and helpful! If you've never been, go! They even lend their tools for free when you buy tile. 


We had a change of plans about halfway through which resulted in a tile shortage and some waiting until we could get more. 
Initially we thought we would just keep the backsplash at the same height all the way around, even the wall without upper cabinets. But once I saw the tiles up, it just looked unfinished to me. So we decided to order more tile and take the backsplash all the way up to the ceiling! 


 Excuse the mess!

And here it is! Finally finished!
 
 
We're so thrilled with how everything has turned out. 

I also finally installed the last of the closet organizers... No more digging through garbage bags of towels and linens! It's only been a year. 😂
The mudroom is close(r) to completion as well. It's organized! 
 

I'd like to build, or maybe buy, lockers to hide the upstairs laundry rough-ins like these...
 
Image courtesy of www.ana-white.com

 
Of course Jake's detached garage took up a bit of time as well. It's not done yet either... But it's close!


We've even put up a few pictures on the wall! Haha! This is huge actually. We worked so hard on those walls that it's hard to put holes in them!
 
The plan for the next 2 weeks is to tackle the lawn and our huge list! We need to re-do our front landscaping thanks to two puppies. One digs holes while the other eats plants, including a whole tree!! She chomped it down like she was a beaver! Hopefully we can get it back looking like this, ASAP! 


Our bedrooms and bathrooms are all done too. We had been putting off caulking and painting trim. Cleaning primed only trim is such a pain. Everything sticks to it! So this weekend I painted, and painted and painted! 

Rylan's room:
 

Tatum's room:
 

Our room:

Master Bath:
 
 
Girls' bathroom:
 
 
We worked all weekend and finally decided to call it quits when the sun went down!
 
We want the house to be 100% complete by mid-May... Because it's going to be for sale! 😬😬😬
Details coming soon!! 

Dec 30, 2014

Reclaimed wood, claimed kitten.

We've known what we wanted for hardwood flooring forever, we just didn't know how we were going to get it in our budget! 


What we wanted:
- wide planks
- reclaimed
- lots of colour variation/patina
- affordable

What we're getting:
- wide planks but varying widths
- 100+ year old hemlock reclaimed from Southern Ontario barns
- lots of colour/variation
- affordable!
- 1 free kitten


Meet Samantha, our newest family member. Named by the girls, in case it wasn't obvious!

We are quite pleased with ourselves for finding the exact flooring we wanted, and within budget. Even if it means now having a cat! 

There are a ton of reclaimed hardwood flooring options out there. But you're paying at least $10-15/square foot, plus install, plus finishing. When you're putting hardwood throughout almost your ENTIRE house, that's steep!

Once I realized the cost of reclaimed floors, I started looking for barns being demolish or barns that are on the verge of falling over to source the wood myself. I was willing to do whatever I had to do to get them. Thankfully we came across a man who demolishes barns and sells the lumber at a reasonable cost. Waaaay easier than tearing down someone's barn and carting it home in the Jetta! 


Once he gathers enough barn boards in decent condition, he'll take them to a mill to be denailed and planed flat and to equal thickness. After that they get sent to another man to be kiln dried and tongue and grooved, turning it into flooring. 
Kiln drying removes excess moisture, and BUGS!!

We will have our own installer install the floor at this point. Because the planks will be wide, they'll need to be glued and nailed down. Some planks will be over 10" wide and they could have a tendency to cup with humidity, which is the reason for using both nails and glue. 

When it first goes down it will still be fairly rough looking. We want a rustic look, but we also want the age and patina to be visible. We'll be hiring someone to do a very light sanding and finishing. We don't want to stain the floor because we like the natural look of aged lumber so we're going to go for an oil finish. 

It is kind of risky picking flooring without actually being able to see what the finish product will be... But it's worth the risk if you ask me!

I'll be sure to keep you posted on the many steps it's going take to get the perfect floor!  I'm hoping to be able to see our cabinets in production sometime in the next couple of weeks too.
I love seeing how everything is made! 


Nov 29, 2014

It's Closing Time!

Our house is almost closed in, finally! We are about a week and a half behind my initial schedule. Not too bad considering the blizzards and hurricane force winds we've had this month and rain the month before that! 

Our framers (who I HIGHLY recommend!) came back to work on our house this weekend to try to make up for lost time. They worked last weekend too!

I always appreciate a hard worker and someone who makes an effort. These guys certainly do both. 

On Friday they finished framing the back covered porch and sheeting the roof with plywood. 


I absolutely LOVE this deck! Neither Jake or I are very big sunworshippers so this deck is perfect for us. 

The roof of the deck is currently being held up temporarily until the timbers are installed. Which reminds me, we need to pick out a stain colour! Note to self... 

Our roofers are starting today, and there's even some sun in the weekly forecast to help seal up the shingles. Yay! 
I was really hoping that they wouldn't need to shovel off the roof before shingling, fingers crossed the weather stays as predicted! 

We picked black shingles, or "charcoal" as the manufacturer calls it.


Framers will be finishing wrapping the house and installing windows today. We have the Building Inspector scheduled for Wednesday, so they better be ready!! Our big kitchen window hasn't even arrived yet... I've been told tomorrow. 

Here's a glimpse of our first windows and front door installed! Love them! I'm glad we went with black. Our framer took the picture and sent it to me... I didn't even have to ask! :)


The front door will be black as well. You know what they say, once you go black... You paint all your doors black to match :)

We still need to order our garage doors. The ones we picked don't come in black, so we'll need to paint those as well. We decided that we'll get them in dark brown so it's easier to paint over. We're still debating whether we should paint them before they're installed or wait till after and paint them in the spring. It's going to look so bad until spring if we wait! People driving by will wonder what the heck we're doing! 


Nov 6, 2014

It's Framing Men, Hallelujah!

We are moving along right on schedule. Well, our newest schedule. 

Framing started on Monday and is moving pretty quickly!
It will be really nice to see walls instead of having to imagine them. 

Jake and I had mandatory training on Monday, so we weren't around on day 1. It made me a little nervous, but my dad was available if anything went wrong. 
Thankfully everything seemed to go fairly smoothly... We're also thankful that our house is down the road from where we ordered all of our building material because a few things were forgotten. Like nails. Who needs nails to frame a house?!

Knowing we couldn't be there we had arranged for the supplies for day 1 to be delivered on the Friday before and our framer had the most current set of floor plans and the rough opening dimensions for the windows before starting. 

We rushed out to the house after our training day to see the progress, it was getting a little dark, but this was day 1 of framing:

Picture of the back of the house

The back wall was framed. The windows look huge now, I love them!

The load bearing wall next to the stairs was also up because it was needed for the steel beam to be installed the following day. 

As we were leaving the house on Monday night we got a call from our framer. He had noticed that 6 floor trusses weren't made long enough to account for the fireplace sticking out of the back wall. 
Just a small oversight by the truss company, but they fixed it right away. 

This is the plan for the floor trusses that they sent trusses for. Notice the back wall is completely flat?


There should be a few longer trusses to support the fire place, like this:


The trusses were dropped off the next day and all is good!

The steel beams and floor trusses were installed Tuesday/Wednesday:


The subfloor is going down now, glued and screwed to prevent movement and squeaky floors. 


The garage walls are also framed, ready to go up


And even a bit of sheeting is on the back of the house. 


Today we dropped off the saddles for the deck posts and the post should be arriving this afternoon or tomorrow. I can't tell you how excited I am that it's finally looking like a house, and that the weather has been cooperating for the most part. I just want the windows in and the roof on before our first snow storm! November, in Canada... This isn't too much to ask for is it? 


Oct 20, 2014

In Floors we Truss

You may remember me mentioning that we're using Open-Web Floor Trusses in a previous post, well today's the day I'm going to explain them!

I'm sure if you've ever been in an unfinished basement and looked up, you likely saw a whole bunch of I-beams or 2x10 floor joists. 

I-beams look like this:
And 2x10 floor joists look like this:


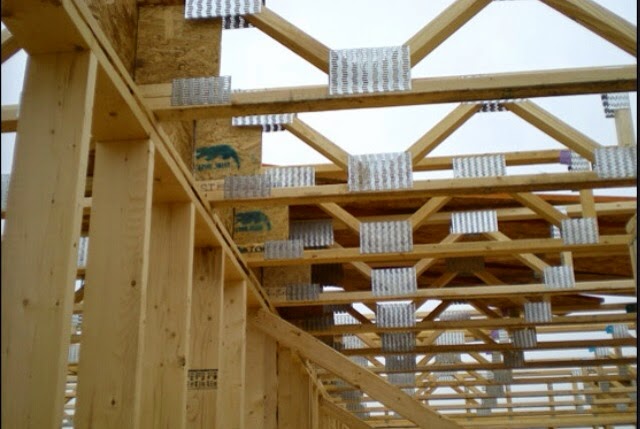
We decided to go with Open-Web Floor Trusses which look like this:


I actually had no idea what Open-Web Floor Trusses were until this summer when I trespassed into my dad's neighbour's house that was under construction. My dad said it was ok to go in, so that means it was :)

After looking up the trusses and pricing them out, I knew we had to have them. 

Here's why:

1) they're open, so you can run all of your wiring and duct work through them without needing bulkheads.  Our 9' basement ceilings will actually be 9'!

2) there's no need to drill holes or cut into floor joists, therefore no compromising the structure. 

3) they can span farther than regular joists. I think they can span up to 22', but don't quote me on that! 
What this meant for us is not having posts in the middle of our future rec room. 

We actually modified our plans half way through the process to accommodate the floor trusses so I can show you the difference. 

Regular joists:

See the dash across the middle of the room and the square? That's a steel beam and support post, right in the middle of the room. 

Now with the trusses, the beam is still there, just pushed back further into the wall of the stairs. Hidden! 


You might be wondering, if there are so many benefits, why doesn't everyone go that route? 
Well, they do cost a bit more money. About 15-20% more than regular joists.
Eliminating an awkward beam and post  and no bulkheads was worth it for us!  

Here is the floor joist plan from TRS Components to give you a visual on how they'll be installed. 


We had great a experience from day one with them. We got the initial quote quickly, were offered great advice for unrelated house building things and always get a quick response to questions.
This is why I love dealing with small town businesses!