Nov 9, 2014

Sunday Funday

After a fun weekend of friends, drinks and food we spent our Sunday morning cleaning up the yard. 

It's just one of the negatives of building your own house, nobody's going to clean up your mess for you!

It actually wasn't too bad. The framers had kept most stuff in piles around the yard so we just carried it up to dump trailer we're borrowing. 


I'm not sure what's wrong with me, but I actually enjoyed doing this. I would way rather play outside in the mud than clean the inside of my actual house. 

It had rained quite a bit the last few days so we also wanted to squeegee off the subfloor. We don't want water sitting on it and saturating the wood. It could cause the subfloor to warp and swell, which could cause problems with our flooring down the road.  


I called dibs on squeegeeing next time. It looked like fun.  Although next time we'll be squeegeeing around more walls! Yay!

The front walls are mostly up! 


The back wall is framed too, can't wait to see it up! Word on the street is that the roof trusses will be on by the end of the week, weather permitting. 

Back wall, framed but not up. 

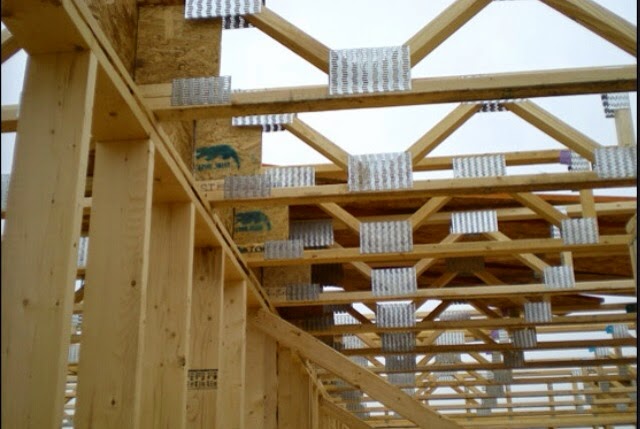
Roof trusses waiting to go up.

I'm afraid to look at the weather for this week. Since there's nothing I can do to change it, I try not to get too worried about it. I'm just happy that our framers aren't made of sugar and tend to stick out the rainy days. 


Nov 6, 2014

It's Framing Men, Hallelujah!

We are moving along right on schedule. Well, our newest schedule. 

Framing started on Monday and is moving pretty quickly!
It will be really nice to see walls instead of having to imagine them. 

Jake and I had mandatory training on Monday, so we weren't around on day 1. It made me a little nervous, but my dad was available if anything went wrong. 
Thankfully everything seemed to go fairly smoothly... We're also thankful that our house is down the road from where we ordered all of our building material because a few things were forgotten. Like nails. Who needs nails to frame a house?!

Knowing we couldn't be there we had arranged for the supplies for day 1 to be delivered on the Friday before and our framer had the most current set of floor plans and the rough opening dimensions for the windows before starting. 

We rushed out to the house after our training day to see the progress, it was getting a little dark, but this was day 1 of framing:

Picture of the back of the house

The back wall was framed. The windows look huge now, I love them!

The load bearing wall next to the stairs was also up because it was needed for the steel beam to be installed the following day. 

As we were leaving the house on Monday night we got a call from our framer. He had noticed that 6 floor trusses weren't made long enough to account for the fireplace sticking out of the back wall. 
Just a small oversight by the truss company, but they fixed it right away. 

This is the plan for the floor trusses that they sent trusses for. Notice the back wall is completely flat?


There should be a few longer trusses to support the fire place, like this:


The trusses were dropped off the next day and all is good!

The steel beams and floor trusses were installed Tuesday/Wednesday:


The subfloor is going down now, glued and screwed to prevent movement and squeaky floors. 


The garage walls are also framed, ready to go up


And even a bit of sheeting is on the back of the house. 


Today we dropped off the saddles for the deck posts and the post should be arriving this afternoon or tomorrow. I can't tell you how excited I am that it's finally looking like a house, and that the weather has been cooperating for the most part. I just want the windows in and the roof on before our first snow storm! November, in Canada... This isn't too much to ask for is it? 


Oct 30, 2014

Permits

Permits, permits, permits... Everyone wants a permit! Or a fee!

These were a lot of work to get together, although things surprisingly went really smoothly. 

We did our homework. We even met with the Chief Building Official before we submitted our permits to make sure we had everything we needed. The last thing we wanted was to submit everything and have them come back to tell us we forgot something. That would have meant more waiting... And we're not really patient people :)

Obviously our permits apply to Lucan-Biddulph, but during our research we discovered that most cities and municipalities in Ontario are the same and based off of the Ontario Building Code. 

What you need for a building permit:

1) Building Permit Application

2) 2 copies of your plans signed by a designer or architect. Sounds simple enough... But don't forget to include:
- floor plans (for all levels)
- foundation plans
- building elevations (front, back, both sides)
- sections & details (this is showing a cross section of the walls and details on how they'll be constructed.)


3) Your designer or architect will need to fill out and sign a "Schedule 1" taking responsibility for the design. They will need to have a BCIN (Building Code Identification Number) as well.


4) Site plan showing:
- location of building on the lot
- setbacks to property lines
- finished grading plan


5) Energy Efficiency Design Summary
This is filled out by your house designer or architect. It "summarizes the compliance path used by a house designer to comply with energy efficiency requirements of the Ontario Building Code". Riiiiight... The only thing that made sense to me on this form was the percentage of window space on the house! We did make sure to show this to our window manufacturer so that we got the proper window efficiency. 

6) Roof and floor truss drawings stamped by an engineer. 

7) HVAC Design Summary. Whoever designs this will also need to fill out a Schedule 1. This form needs to be filled out by anyone who designs anything for the house, unless it's stamped by an engineer. They're exempt. 

Because we aren't on a sewer system we also needed a permit for a septic system. For this permit we needed:

1) Permit Application

2) Schedule 2 which is information on the septic system installer. 

3) Septic system design and site plan done and stamped by an engineer. 

Our lot backs onto the Little Ausable River so because of this, a portion of our lot is in a "regulated area". So you'll never guess what we needed to get from the Ausable Bayfield Conservation Area... Another permit!


We needed approval to put our septic bed in the regulated area. We were told multiple horror stories about getting permits from the ABCA. We were told they take forever, sometimes months. So we started this permit as soon as we could. They were surprisingly quick!! I think they just wanted to get rid of me! 

Permits are pricey!! For EVERYTHING required for these permits, including drawings, development fees, engineers and permit fees, we have spent just under $10,000 before we even broke ground. Insane!!!
Now we should get $2000 back from the municipality when everything is done. For some reason they require a security deposit. I'm surprised we didn't need a permit for the security deposit too... 

I wish we could say that we're finally done with permits... But there's a rather large detached garage in our near future that will also require a permit. More on that later. 

The worst part about getting the permit together was waiting. We had our plans done by the designer. Then we sent them to the floor and roof truss company to design the trusses. Once we got those drawings we sent them to the HVAC designer. Then once we had both the truss designs and HVAC design we had to send them back to the designer to make any changes based on what was designed by the truss and HVAC people. 

We found a great place to get our plans printed. It's downtown London, which is kind of a pain, but they print them for $0.60/page!  Plans for everyone!!!  It's called Mercury Blueprints. Just bring your files and they'll print them for you on the spot. We priced other printing companies and they were anywhere from $5-15/sheet. When your plans consist of 6 pages each, that can add up quickly. 

One thing we didn't realize about this whole process was how long everything takes. We started the house drawings in July and finally were able to apply for our permits 2 months later. In those 2 months it felt like we were yoyos running back and forth and it felt like we weren't getting a lot done... Now in the next 2 months we will have a shell of an entire house!!  Framing will be starting in a mater of days and I can't wait to walk through the house in 3D!


Oct 26, 2014

Foundation is done!!

The last time I posted an update about the foundation was when the forms were going up. 

Well... they were finished a week ago Friday:


The forecast for Monday was calling for rain, so we weren't sure if they'd be on schedule to pour the foundation or not. Somehow, it rained all around Lucan, but stayed away from our house!  It did start to rain a bit towards the end of the day, but everything was done. 

Concrete pumper used to fill the forms. 


The following day, forms were coming off. It's really starting to look like a house now!

Garage

Walk-out basement

9' basement ceilings are a must when you're 5' tall. :)


See the wooden framing all along the top portion of this wall? There are some on the front of the house and a small section on the West wall as well.  These were put in the forms before the cement was poured to make what is called a 'brick ledge'. What a brick ledge does is it allows for the brick, or in our case stone, come down further on the exterior of the house. Due to the slope of our lot, this was necessary or else we would have had 6' of exposed concrete foundation towards the back of the house. That just wouldn't have been pretty! 

Here is what it looks like with the forms completely gone. 


Don't mind the poor lighting... I came straight to the house after working nights and the sun wasn't quite up yet!  But the sunrise was pretty!


The foundation needs to sit for a week before it can be back filled so it feels like things have slowed down. 

Waterproofing was done. There is more of where the brick ledge is on the front. 


The foundation was inspected and our underground plumbing rough-ins finished and inspected this week. So it wasn't all just waiting around... But we're really anxious to start framing!


So the plan for this week is to back fill on Monday and Tuesday. Pour the basement and garage floors Wednesday and pour the front porch floor on Thursday or Friday. 

Our hydro line to the house is also going in on Tuesday too while the backhoe is there to dig a trench. Now if we can just coordinate Union Gas to show up at the same time it would be great!

Framing will be starting on Monday, November 3rd once the floors and porch have had time to dry!  


Oct 20, 2014

In Floors we Truss

You may remember me mentioning that we're using Open-Web Floor Trusses in a previous post, well today's the day I'm going to explain them!

I'm sure if you've ever been in an unfinished basement and looked up, you likely saw a whole bunch of I-beams or 2x10 floor joists. 

I-beams look like this:
And 2x10 floor joists look like this:


We decided to go with Open-Web Floor Trusses which look like this:


I actually had no idea what Open-Web Floor Trusses were until this summer when I trespassed into my dad's neighbour's house that was under construction. My dad said it was ok to go in, so that means it was :)

After looking up the trusses and pricing them out, I knew we had to have them. 

Here's why:

1) they're open, so you can run all of your wiring and duct work through them without needing bulkheads.  Our 9' basement ceilings will actually be 9'!

2) there's no need to drill holes or cut into floor joists, therefore no compromising the structure. 

3) they can span farther than regular joists. I think they can span up to 22', but don't quote me on that! 
What this meant for us is not having posts in the middle of our future rec room. 

We actually modified our plans half way through the process to accommodate the floor trusses so I can show you the difference. 

Regular joists:

See the dash across the middle of the room and the square? That's a steel beam and support post, right in the middle of the room. 

Now with the trusses, the beam is still there, just pushed back further into the wall of the stairs. Hidden! 


You might be wondering, if there are so many benefits, why doesn't everyone go that route? 
Well, they do cost a bit more money. About 15-20% more than regular joists.
Eliminating an awkward beam and post  and no bulkheads was worth it for us!  

Here is the floor joist plan from TRS Components to give you a visual on how they'll be installed. 


We had great a experience from day one with them. We got the initial quote quickly, were offered great advice for unrelated house building things and always get a quick response to questions.
This is why I love dealing with small town businesses!  


It's the inside that counts... Or is it?

Picking the exterior of our house has been causing me a lot of stress lately. I don't want to make any mistakes because I know how important curb appeal is... But I also don't want to do anything too typical either. 

With finishes inside the house, you know that eventually they will become outdated and need some revamping... But the outside takes a lot more money, a lot more time and a lot more guts to change down the road. 

We have decided to do a stone/siding mix. We chose James Hardie fiber cement board in Iron Grey for the main part of the house.


It's kind of a blueish-grey and we really, really like it. 

I'm not a huge fan of bright, stark white trim paired with dark siding, so we chose James Hardie Cobblestone as our trim colour. 


I think it's a little softer and a little more subtle with the Iron Grey. Although trying to find a picture of that combination has been impossible. I just have small 8x8 samples to go from so I really hope that this doesn't become a risk I'll regret! 

By not choosing white as our trim colour it made picking a window colour a little more difficult. I've seen a lot of houses where they've tried to match trim and window colours (typically beiges or creams) and have failed miserably. The easiest way I could think to avoid this issue was to go with something that doesn't match at all. Black!  

I've seen black windows look really good on houses, but I've also seem them look too dark when paired with other dark trim or stone choices. That's what I'm afraid of. 

When there's enough of a light trim with the black window, I think they look elegant and classy.


We ordered our windows from Dashwood Windows. We have had a really good experience so far. Customer service has been phenomenal and I would recommend them to anyone. They even came out to our house and went through our quote and plans window by window. For people who have never ordered windows before, this settled our nerves and made us feel confident in our decisions. 

We have 3 windows on the back of the house that were a struggle for a couple other companies we had quotes from. Dashwood didn't have any issues at all. 

Other companies struggled with the great room windows:
We decided to leave the grilles out of these windows so we have an unobstructed view of the yard and mature trees. 

And my favourite window in the whole house! The kitchen window:

I guess the problem with this window was having the camber top AND windows that open. The "V" shape in the drawings shows windows that open. 

Remember the dormers from our plan?


We were originally going to use James Hardie Shakes in iron grey as well up there, but after a trip to the hardware store we decided that we wanted to have the look of real cedar. 


Cedar tends to be pretty expensive. So we looked at every kind of cedar-style shake available on the market, but they all looked really fake. 

Since those spaces aren't very big, we opted to go with real cedar shakes. We wanted something completely maintenance free, but I guess staining a few shakes every 5-10 years isn't a huge deal. 


We will stain the exterior pine timbers to match the cedar shakes for a more cohesive look. 

We were worried about trying to coordinate too many wood colours, so we're going to paint the garage doors and front door black to match the windows. I may paint the front door a different colour eventually, but this will give us a good start!  

The garage doors we're going with are a carriage style door with arched windows to highlight the camber garage door frames. These are Upwardor from the Bronte Creek collection. They're affordable, have a high R-value (insulation) and are Canadian made!


The only problem is they don't come in black! So we're buying them in dark brown so it's easier to paint black instead of trying to painting black over white. We won't be able to paint them until the weather is nicer next spring, so I'm sure many people will question our garage door colour choice until then! 

The bottom part of the house will be done in stone. We picked Permacon Lafitt which is a man-made stone. Man-made stone tends to be easier to install because they fit together better without much chipping/reshaping so labour and material costs are lower. Yay! But the actual stone is about twice to cost of brick. Boo. 


We debated about using stone on the front and a coordinating brick for the sides and back to save money, but we think that brick will really take away from the beauty of the back of the house, so we're sticking with stone all the way around.  This is why we've cut out quartz counter tops and a few other things that can always be changed later if we wanted.

Can you imagine this as brick? Just not the same is it?


Oct 17, 2014

It's taking shape!

It's starting to look like something!  We had a big day at the house yesterday. 

Septic tank is in! Ooh exciting stuff on the blog today! 


Now don't ask me if those 2 green humps can be covered up or hidden eventually. I'm going with yes because I don't want to look outside and constantly be reminded that there's a giant container of poop in the yard. I think I'll need to do some creative landscaping. 

I told Tatum that it's where her poop will go and now she thinks we'll have to go outside to use the bathroom :)

We also have footings!  They were really quick with getting them in too. I worked Wednesday but Jake went out and sent me pictures. My dad went out there too and I made him send me pics as well. I'm honestly super close to asking the contractor to send me update pics every few hours... I'm trying my hardest not to ask. But when it comes to framing I can't make any promises! 

This was Wednesday around noon, forms for footings: 
(photo credit goes to Jake)

And I went out Thursday morning as soon as I dropped the girls off at school and it already looked like this!


And then by the afternoon the forms for the foundation had started!


They expect to be able to pour the foundation on Monday, but I just looked at the forecast and they're calling for rain. 

We're heading out to the house right now and I can hardly wait to see the progress. It's been raining off and on now too so I hope they're out there... I'll supply the ponchos!